This is (hopefully) part 1 of a muli-part series of blog posts about Stripe.

Incorporating a payment system into a web application has been an aspiration of mine for some time now. I kept putting it off because it seemed too daunting - the programming equivilant of climbing Mt. Everest. This weekend, however, a few flatiron students and I built an app called CodeWithUs. The idea is to allow people to post hackathons, and then get the right mix of people to attend them. We finished the data modeling and authentication on Saturday, and then took Sunday to fill in some of the views. Once the views started looking pretty good, Christina and I decided to integrate Stripe so that users could pay for a ticket to a hackathon.
We choose Stripe because we heard it was the easiest API for developers. This seemed like the perfect way to build our fist payment system! I first made a Stripe account - which took all of 2 minutes. Then we started looking at the excellent documentation and found a tutorial for Stripe Checkout using Ruby on Rails.
1
| |
We followed the tutorial, but had to make some slight modifications sine we were incorporating this into an existing application.
We first added the Stripe gem to our Gemfile.
1
| |
Then we generated a controller for charges.
1
| |
We copied the suggested ‘new’ and ‘create’ actions from Stripe into our charges controller.
1 2 3 4 5 6 7 8 9 10 11 12 13 14 15 16 17 18 19 20 21 22 23 24 25 26 27 28 | |
Then we added a resource for charges to our routes file, which will give us all the standard routes we need.
1
| |
At this point we created a new file called stripe.rb in the config/initializers folder. We were supposed to store our passwords safely, but Figaro, the Gem we were using to do this, was causing issues, so we temporarily hard coded the keys in.
1 2 3 4 5 6 | |
This is where we started to venture off the beaten path and go our own way. The tutorial wanted us to create html.erb files for the overall layout, and for the ‘new’ and ‘create’ actions. We already had a layout, and for the sake of getting this to work, we just appended the charges#new functionality into the hacakthon show page. We also were able to dynamically set the price in Stripe based on which hacakthon page the user was on.
1 2 3 4 5 6 7 8 9 10 11 12 13 14 15 16 17 18 19 20 21 22 23 24 25 26 27 28 29 30 31 32 33 34 35 36 | |
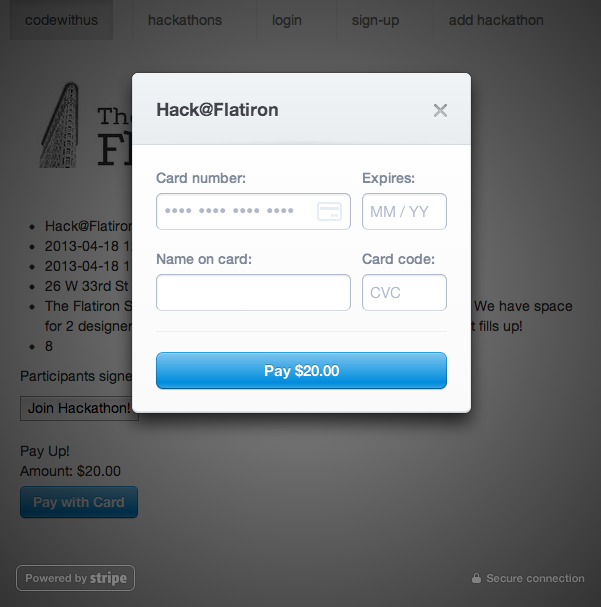
At this point we were able to have our users click on ‘pay with card’, enter their credit card information, and actually buy a ticket to our hackathon!
This is how the page looks with the ‘Pay with Card’ button on the bottom.

This is what the popup looks like where a user can enter in their credit card information to buy a ticket.
The most important skill I’ve developed at the Flatiron School is getting better at taking big problems, and breaking them down into small ones. In order to climb Mt. Everest the first major goal is to make it to base camp one.

Similarily, the first step of fully integrating Stripe payments into your application is to allow a user to successfully buy one product from you. Today, we did this, and it feels great. However looking up, there is still a long way to go to the top of Mt. Stripe. We can’t actually accept real credit cards (only test ones), we are not capturing any information about our customers, and we can only do these transactions as a javascript popup. There is a lot of work left to go, but just accomplishing this small step has given me a lot of energy to push foward towards the summit!